
A complete guide to all of the main voice control and screen reading options for iPhone and iPad users
Who is this post for?
The aim of this post is to explain to sighted people how to set up different forms of voice control and screen readers on Apple iPhones for friends or family who are visually impaired or blind. There are several options we describe here and lots of labels you have to get familiar with, so you will have to choose the one(s) that works best for the person using the phone or tablet.
The three main tools for using your iPhone with voice are:
- Siri usually enabled by default, responds to commands to go home or open apps, but doesn’t read what’s on screen
- VoiceOver which reads the screen and can be used to interact with the screen, by clicking buttons, etc without being able to see it / see it well. Recommended for all with a visual impairment which means they can’t read text on the screen despite enlarging it to maximum in the Accessibility settings.
- Voice Control – similar to Siri and can be used alongside it, but has more sophisticated commands for entering and editing text and scrolling. Recommended for more advanced users and was originally developed for those who can see but with a mobility issue.
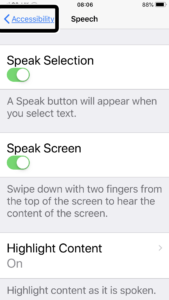
Spoken Content is another screen reader option to read on screen text that you may want to investigate if VoiceOver is too involved. When setup you can swipe down with two fingers to read everything on a screen, which i think is mainly useful for web pages, but it will go through messages one-by-one.
There are lots of great guides to doing this by visually impaired bloggers, but they are writing for their audience who may already be knowledgeable about the assistive features of iPhone.
I find when working as a volunteer at AbilityNet, that often people who are visually impaired will likely find it useful to NOT try to use all three together. For the visually impaired, it’s usually best to focus on VoiceOver and Siri together.
Since it’s difficult to find VoiceOver and Voice Control within the Accessibility Settings, it’s often best for the phone or tablet user to ask Siri to turn them on and off using their voice, e.g. ‘Hey Siri, VoiceOver On’. NB. Typically you have to wait for Siri to disappear sometimes before using VoiceOver which is a pain, you can hear when it closes, before issuing a command. That said, it is well worth going to the relevant Settings to see the guides, tutorials and lists of commands.
Why am I writing this post?
I’m writing this article to support my voluntary work for the charity Ability Net UK which involves setting up and troubleshooting software for different devices like computers, smartphones and smart speakers. This is to help the many people who need accessibility features set up to use these devices including people who are visually impaired, disabled or older people who need assistive technology, for example, people who have had a stroke.
This is a checklist / step-by-step reference for me as I learn about the best techniques myself, but I hope others may find it useful too when setting up voice-activated features for their friends, family or themselves.
Views are my own and I’m not representing AbilityNet.
Last updated in January 2025 to use latest iOS18 approaches.
Steps to setting up access
These steps are how I prefer to set up VoiceOver for a visually impaired person, based on my experience, but the steps and tips can be varied to suit. A few of the steps are optional depending on the tradeoff between security and ease of use.
Step 1. Switch off passcode and face recognition (optional)
Passcodes are very difficult, if not impossible, for the visually impaired to enter the 4 or 6 digit code, so I recommend not using them, unless it’s important you want to restrict access to confidential information or apps. It’s a decision to be discussed with each user. If they are starting by using the phone for calling only, with Siri, a common scenario, then I think they’re unnecessary. Face recognition works better, but it can cause problems when it doesn’t work since it’s not easy for someone to see the messages explainng it hasn’t worked.
How?
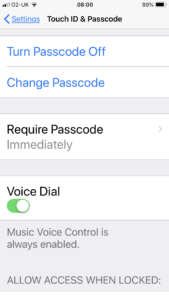
1. Choose Settings, then TouchID and Passcode.
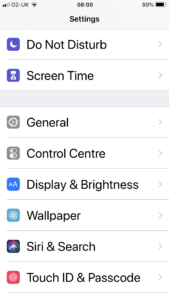
2. In TouchID & Passcode, Turn Passcode Off.
Step 2. Switch off TouchID (optional)
Like with passcodes, these TouchID or Face recognition can be difficult since it can be hard to see whether the security option has been passed or not, so in my view, it’s best to keep the phone open, at least initially.
How?
1. Choose Settings, then TouchID and Passcode.
2. Set ‘Use TouchID for’ off for iPhone Unlock and other options

3. Turn on VoiceOver
VoiceOver is a screen reader speaks items on the screen as you tap to select or slide your finger between menu options and you then confirm you want to select the option by double tap.
Scrolling is achieved through using three fingers.
How?
1. Choose Accessibility from Settings
You have to scroll down to below General. Below is for iOS15, the video is more up-to-date, but it gives you an idea.
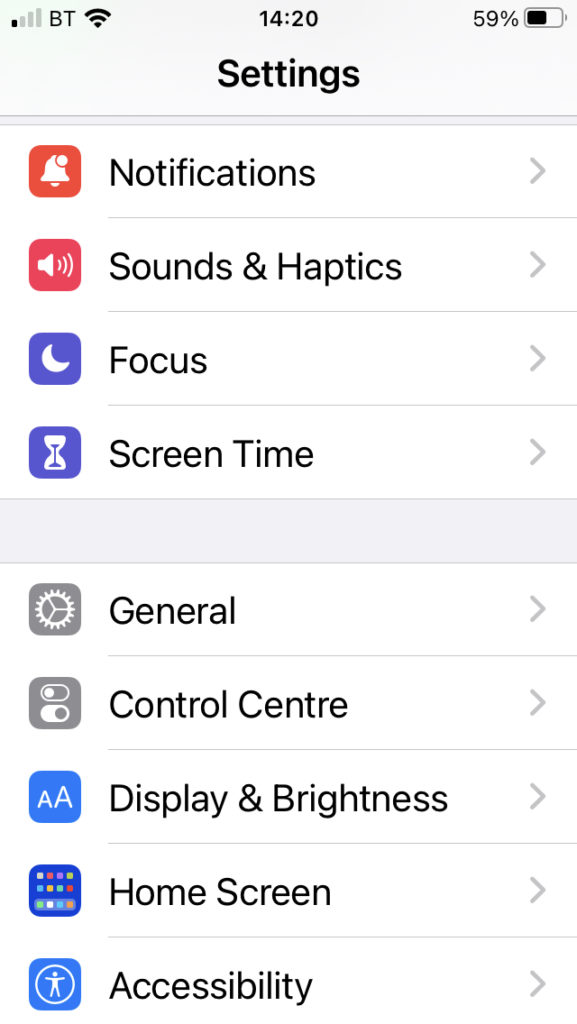
2. Choose Voiceover from Accessibility menu
It’s at the top.

3. Turn VoiceOver On
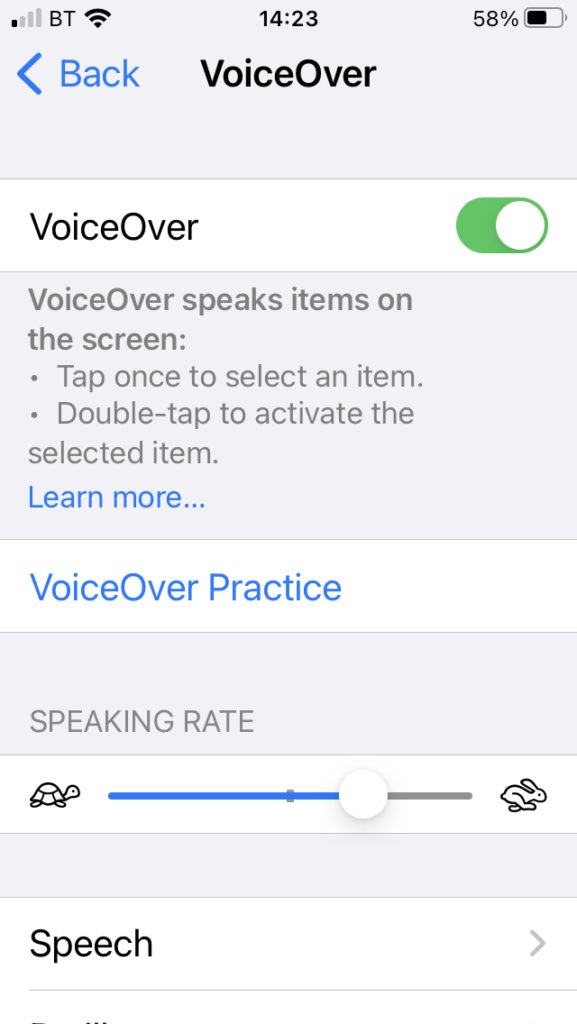
Congratulations, VoiceOver is now on. The practice is quite limited. So practice by using a commonly used App like Mail or Messages. The three main Voiceover interactions are:
- Tap once to select an item. Try this by tapping on Back above.
- Double tap with a finger to activate or select the item. After Back is selected, Double tap anywhere on the screen to go back.
- Swipe three fingers to scroll. You can only scroll when the screen is scrollable and there is no button selected.
You can also Move your finger around the screen, e.g. on home screen and it will read each item you rollover
Tips for using VoiceOver
There are so many things to remember when using VoiceOver, I have noted them here since I try to get these all across to new users. If you’re looking for a more in-depth review I recommend the SightForSurrey VoiceOver lesson handbooks – they have separate lessons for iPhones with / without a home button.
- A two-finger double tap is used to answer or hang up incoming calls, or Siri can be set up to answer.
- It’s worth increasing the speaking rate a little make it quicker to hear instructions in the voiceover settings. You move the fingers up / down to change the speaking rate when VoiceOver is on.
- Now it’s possible to change the voice, it’s useful to change from the grating default voice to a softer voice in the VoiceOver settings (I’ve often been asked, can you change the voice?)
- Set up the Home screen to have as few app icons as possible and move the most popular ones to the top and the dock at the bottom. The user can then get familiar with accessing them this way.
- To access the home screen if the user doesn’t have an older version with a home screen button, note that different gestures are required with VoiceOver switched on – see Apple summary. Since it’s easiest to return to home to access other apps, it’s essential to learn how to access home: according to Apple, youDrag one finger up from the bottom edge of the screen until you feel a vibration or hear two rising tones, then lift your finger. For me this seems to work best in two stages. Three rising tones gives the app switcher.
- If VoiceOver won’t be used all the time, it could be worth setting up the Accessibility shortcut to Turn it on/off. This is either three clicks of home button or three clicks of the side button if there is no home button / Face ID. It’s probably easier to turn it on and off with Siri.
- Swipe left / right with one finger to move between the screen elements with the focus that are read out by the screen reader
- Scrolling up down requires two fingers, but you need to select a list element to be able to scroll otherwise there will be an error sound.
- A three-finger tap is use to turn the screen curtain on and off. This won’t affect blind users, but helpers and I’ve found the curtain can be turned on and the screen will be black. Tap three times with three fingers to turn it on and off. On an iPhone with Face ID and no Home button, Drag one finger up from the bottom edge of the screen until you feel a vibration or hear two rising tones, then lift your finger.
- Once someone is used to using VoiceOver, it’s worth suggesting they learn about the Rotor which enables commands for what is selected. For example, when you are browsing a web page it can be useful to use the Rotor to select Headings to navigate through headings on a web page by swiping left or right (if this has been selected in the Rotor menu option within Accessibility). Be warned that the Rotor is tricky initially since you have to use a gesture with the thumb and forefinger to rotate a dial that appears on screen. Learn more about the Rotor from Apple.
Here’s an example of using VoiceOver from YouTuber Molly Burke – How I use technology as a blind person! Inspiring whether you’re sighted or not, so I’ve kept it since it explains the principles eventhough it is now dated.
Note that this is a fairly old clip before Siri was introduced.
There are also options to speak selection and speak the screen by swiping down with two fingers from the top of the screen.
Siri
Siri is a fantastic tool for the visually impaired since it enables you to ask the phone to do things for you like calling people on the phone or doing a search. It’s like its cousin Amazon Alexa used in smartspeakers. Make sure you get a sufficiently powerful iPhone as explained below.
How?
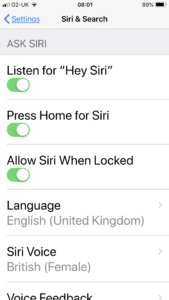
- Switch Siri on using the Siri & Search Settings.
- Select both the Listen for ‘Hey Siri’ and ‘Press Home for Siri’
What can Siri be used for?
Siri could be useful for opening apps, finding contacts or creating / reading messages or emails, e.g. Send Message to <Contact name> or Read Messages or New Message – the interaction with Siri breaks it down into steps.
It also works in combination with VoiceOver and VoiceControl, so can be used to switch them on and off.
- Making phone calls
- Managing phone conversations and voicemails
- Using Apple’s FaceTime
- Finding contacts
- Reading, sending and replying to messages
- Scheduling meetings and conference calls
- Checking calendars
- Receiving reminders
- Making notes
- Searching the Web
- Posting to Facebook and Twitter
- Using maps and getting directions
- Finding local businesses and restaurants
- Playing music or listening to podcasts
- Using the calculator
- Looking up photos and videos
- Managing iDevice settings
- Taking dictation
- Getting the latest news, sports, weather, entertainment and stock market information
Voice Control
This is a separate option to Siri and Voice Over, that is best used alongside them, also available in Accessibility sttings, along with a list of commands. It is worth considering since it can be better than Siri for entering and editing text and can make it easier to open apps, scrolling etc.
Options:
Say, for example, “Open Control Center,” “Go home,” “Tap item name,” or “Turn up volume”.
Say “Stop listening” or “Start listening”.
Gesture replacements include ‘Scroll Up/Down’, ‘Scroll to Top/Bottom’.
Editing text is possible in any edit field, e.g. to add a comment to a Facebook post or Send a message. To add punctuation, just say the ‘full stop’, for example. Emojis are also supported, for example, say ‘Smile Emoji’. The text will be added as the user speaks. By default Voice Control is in Dictation Mode, but it can be changed so that not everything is entered by saying ‘Command Mode’. You will likely need to use VoiceOver to click the button to send the message by selecting the button and then tapping.
Say “Show commands” to see all commands in Accessibility.
It can also be used on larger desktop/laptop screens to control the screen by displaying a grid.
Assistive Access
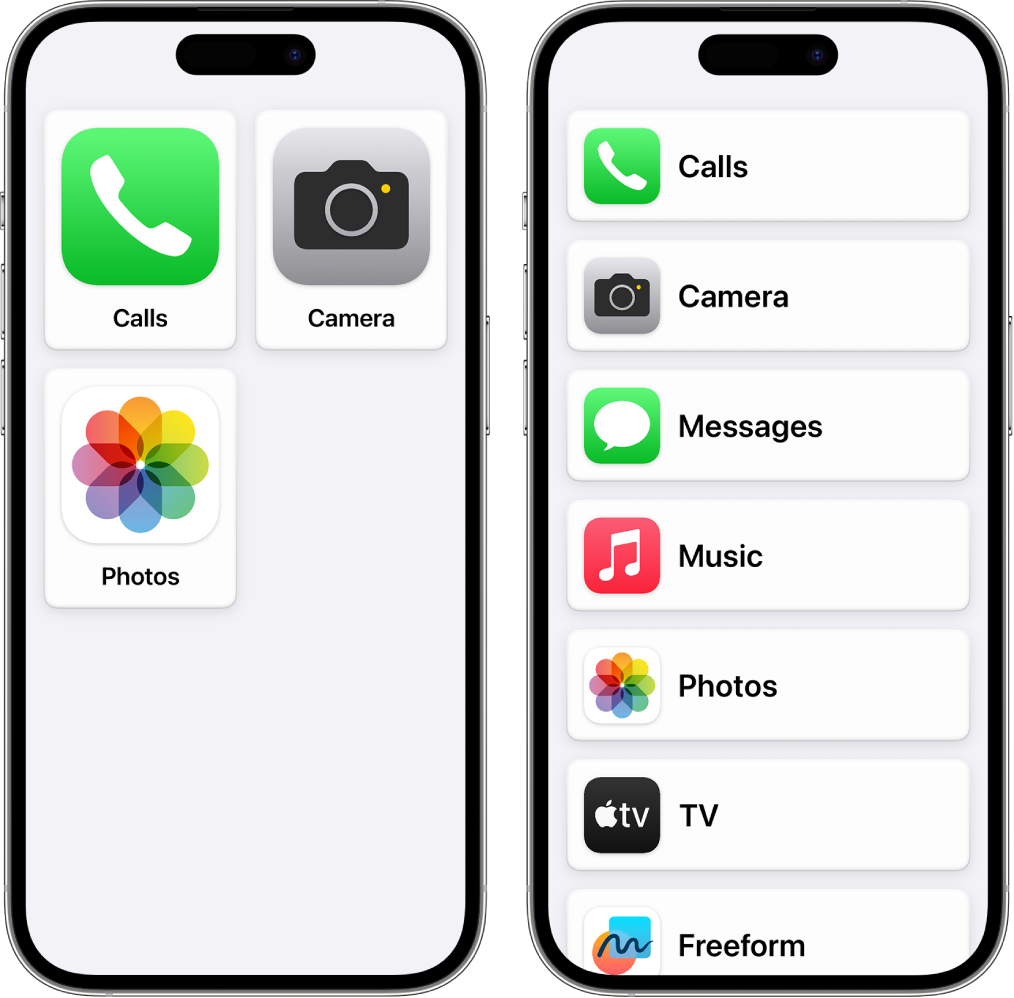
Not a voice control tool, but we mention it since Assistive access is a great feature introduced in iOS17 to make the interface elements much larger for people with severe visual impairment. The icons can be even larger if you choose smaller icons, e.g. Just choose Calls and Contacts in the Accessibility options.
Assistive Touch
You can set up AssistiveTouch on an iPhone or iPad top add a circle button to the screen which will replace some gestures – for example – tap on it twice to go home. This dates back to iOS5. It is more useful now there isn’t a home button on most iOS phones for people with conditions who find it difficult to use gestures, e.g. Parkinsons.
Common problems to avoid
Is the case causing a problem with the microphone or speaker?
The design of many cases will make it difficult for the microphone or speaker to work effectively.
Which iPhone version is best?
I’ve found that for it to work you do need an iPhone with a sufficiently loudspeaker and powerful enough processor. The larger format iPhone 7 Plus and 8 Plus or more recent are best for this.
It’s arguably also best to have a home button to activate, so you can argue that older models with a home button like the 7 and 8 are better than the newer iPhone X and iPhone 13+ models which don’t have buttons. The iPhone SE is the only one with a button AFAIK, so it could be worth considering that
Other guidance for first-time visually impaired users of iPhones
- Apple iPhone Accessibility home page – choose Vision or Mobility
- My Computer My Way (Ability Net) – Search for instructions for these voice options for your version of iOS